Welcome to your command center. This isn’t where the action is, but it’s where you make the action happen. This quick guide will help you navigate the main menus so you can get to work.
BI Studio Overview
1
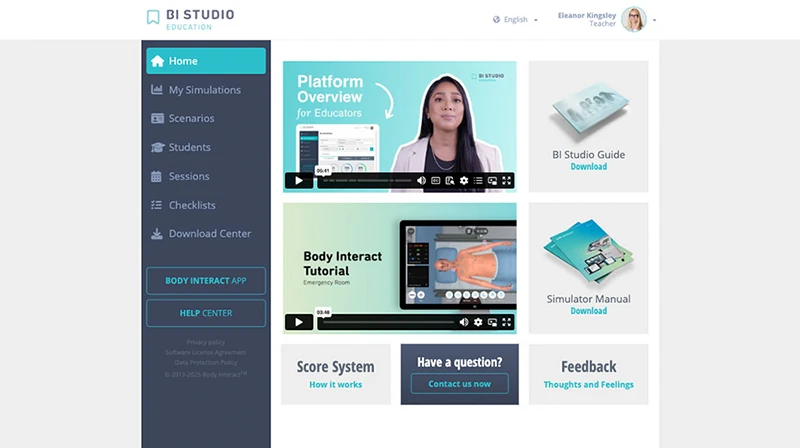
Home
2
My Simulations
3
Scenarios
4
Students
5
Sessions
6
Checklists
7
Download Center
8
Body Interact App
9
Help Center
10
Account Settings
11
Language
- Home: This is your dashboard, a central hub for key resources, where you can find quick-start guides, tutorials, and links to important information about the platform.
- My Simulations: The place to review your own performance. Dive into your personal simulation metrics and track your progress.
- Scenarios: Find the full catalog of clinical scenarios available in your account, and click on each one to review its specific details and configuration options.
- Students: Your student list. Here, you can manage your students, organize them into groups, and dive into their individual and group performance data.
- Sessions: This is where you create and manage all of your training, evaluation, and OSCE sessions. Build your Training, Evaluation, and OSCE sessions to assign scenarios to your students and review the metrics for each session you’ve created.
- Checklists: Create and manage checklists here for structured student evaluations.
- Download Center: This is where you and your students can download the Body Interact app for multiple devices
- Body Interact App: Opens the Body Interact app directly, automatically logging you in with your BI Studio credentials.
- Help Center: Opens the home page of the Body Interact Help Center.
- Account Settings: Access your personal account settings, including your name, photo, password, and the option to log out.
- Language: You can change the language of the BI Studio interface, with the following available options: English (International, United States, United Kingdom), Spanish, Chinese, Japanese, French, Polish, and Portuguese (Brazil, Portugal).
Was this article helpful?
YesNo